|
|
|
|
Week 6: Metering
Before we start, do you have time to fill in this very quick 6 question survey to let me know what you think about the course so far, and what you have achieved?
|
|
|
|
|
How did you get on last week shooting on Manual mode? Congratulations if you managed to find Manual mode and worked out how to change the settings independently. 10/10 if you had a go at the homework and got a couple of photos that were broadly what you were aiming for.
If you found it utterly confusing, and are feeling dispirited, you'll be pleased to know that the worst is over. I can't say this too often:
You don't need to shoot on Manual mode all of the time.
You simply need to know:
1. There are 3 settings.
2. They each control the light.
3. They each also have a creative effect (or consequence, for ISO).
Throughout the year, when you have time to concentrate, keep coming back to these first 5
lessons. Try shooting on aperture and shutter priority. Remember to look at the shots you take on auto, and think about whether you could do better if you take control. And at least once a month, have a go on fully auto again.
This week is the last of the technical lessons. Stay with me for one more bumper email, and then you can look forward to the next module which is a creative one: Composition.
|
|
|
|
|
Last chance to claim the 50% discount on the video course:
|
|
|
|
|
|
|
METERING
Think back to the first lesson, when you used auto mode and took a photo of something white and another of something black, and they both came out grey.
In the following 3 lessons you learnt how to take control of the 3 settings the camera uses to control the light.
In this lesson you'll learn: "How do I know what the right exposure is?".
You know the camera gets it wrong (it turns everything grey). And you know you can take control. But the final piece of the puzzle is - by exactly how much has the camera got it wrong?
|
|
|
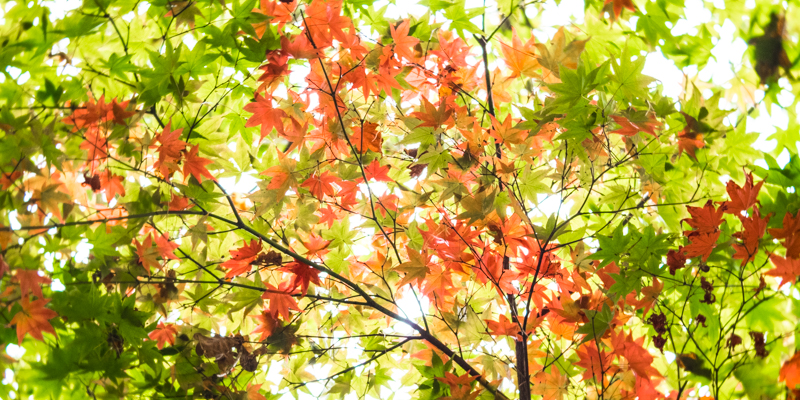
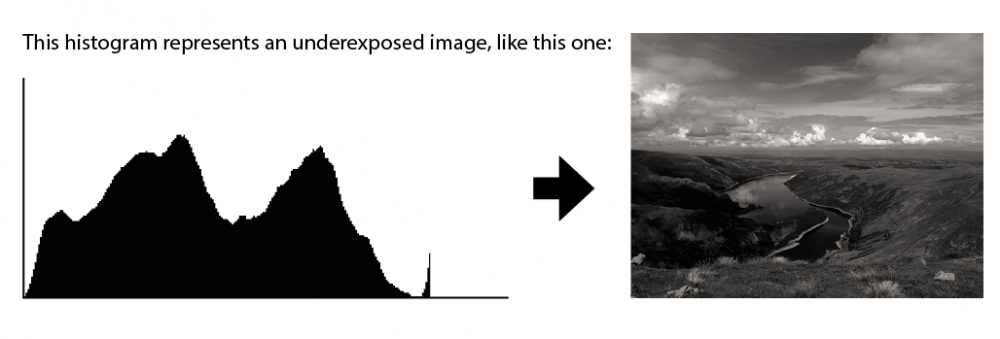
You are not always taking photographs of something that is conveniently all black or all white. Most of the time you are shooting a mix of colours and tones. And it is very difficult to convert a scene into black and white in your head, and then average out all the tones to see how far off the camera is going to be. In
the header image for this email for example, the greens and reds of the leaves combine with the sky to create a very difficult image to estimate the correct exposure for. And in fact the camera's auto exposure for that shot underexposed by 3 entire stops.
The good news is that you don't need to constantly convert to black and white in your head and make tone estimates. On the back of every camera there is a display that tells you exactly what the camera is seeing. You can then decide if you and the camera are seeing the same thing, or if the camera is going to get it wrong and expose too dark or too light. The display is called the histogram. It's simply a bar chart of tones, with black tones on the left and white tones on the right, and will look something like this:
|
|
|
|
|
Once you know how to interpret the histogram, you can use it to check what the camera is seeing. Then you can either accept that exposure; or override it using any of the priority modes, manual mode, or a great little trick called "exposure compensation" (more on that below).
What is the histogram?
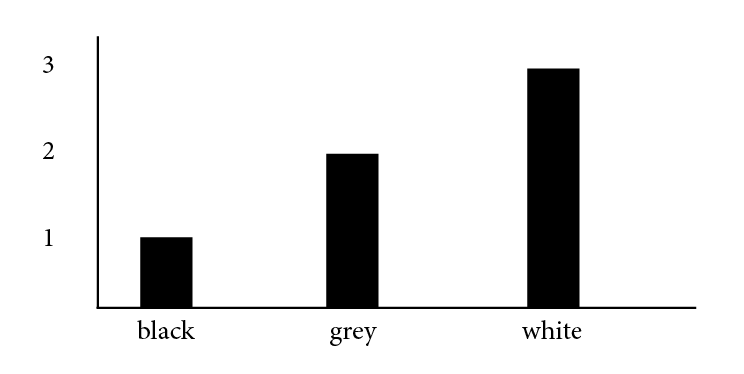
The histogram is just a bar chart showing light values. Imagine a bar chart showing how many apples, pears and oranges a shop sells in a week. If it sells 10 apples, 20 pears and 30 oranges, the bar chart will look like this:
|
|
|
|
|
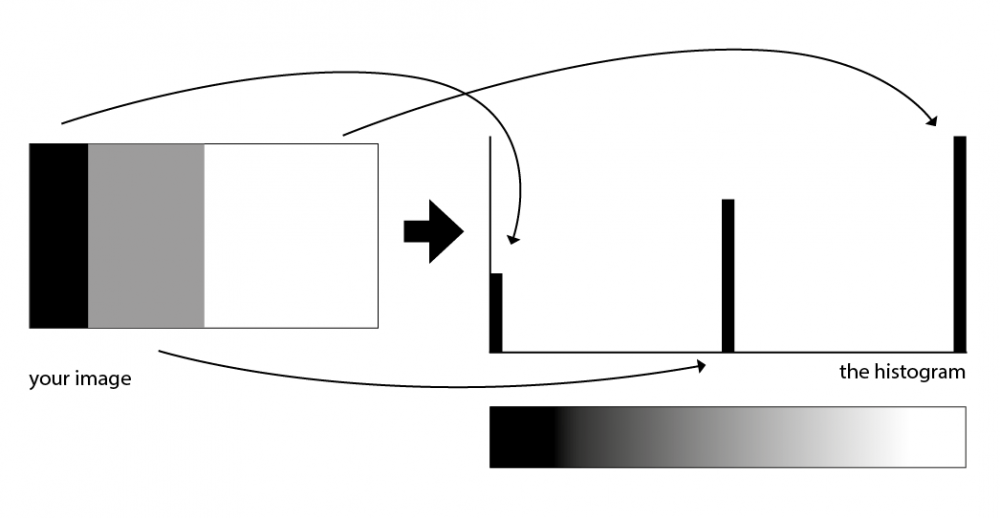
Now imagine you are looking piece of paper which has 1 black stripe, 2 grey stripes, and 3 white stripes. The bar chart would look like this:
|
|
|
|
|
And that is all the histogram does. The camera assigns a tone value (from black to white via all the greys) to every single pixel in your image. It then plots them on a bar chart to give you your histogram. It counts all the pure black pixels and gives them a bar all the way to the left, and does the same for every shade of grey all the way to pure white over on the
right:
|
|
|
|
|
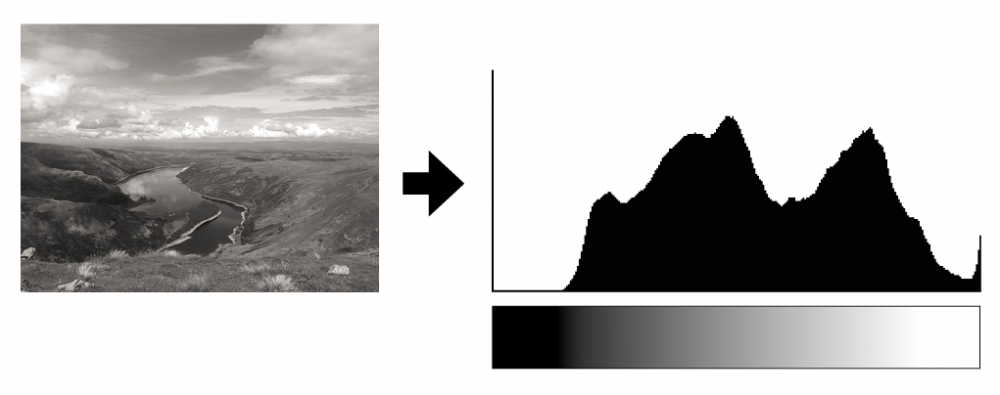
When it comes to an actual photograph, the camera just counts all the pixels, sees how many of each tone there are, and then plots them all on a bar chart:
|
|
|
|
|
In this image the histogram is showing that there are no black and darker tones at all. Does that look right? It's hard to tell in the reproduction, but that is accurate. In the original image you can still see plenty of detail in the shadows which means they are not completely black.
And at the right hand side, the white bar chart has started to "climb the wall" - it
finishes with plenty of white tones showing. This is as sign that the highlights have blown out, and lost all detail - you should be able to see areas of pure white somewhere in the image. Is that correct? Yes - some of the clouds are pure white.
Using the histogram to check exposure
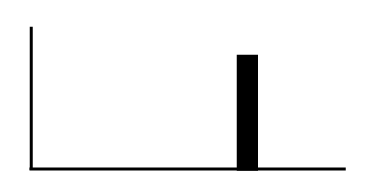
If the histogram in this example had looked like the following diagram, then you would know that the exposure the camera had picked was wrong. Because you can look at the histogram, see that the blacks are touching on the left, and then look at the scene and realise that there are no pure blacks. The histogram is also showing no pure whites - but you know there should be. You would deduce the camera has got the exposure wrong and you can correct it.
|
|
|
|
|
A recap:
1. The camera's auto modes and LCD sometimes get the exposure wrong
2. Your eye/brain also sometimes gets things wrong
3. The histogram never gets anything wrong
4. You can see whether the exposure
is correct by checking if the histogram looks like it should - you can't rely on your eyes to do this because they often get it wrong
5. If the histogram is not how it should be, you can compensate for the camera's mistake by changing aperture, shutter speed or ISO
Metering
The way that the camera interprets the tones of an image varies depending on which metering mode it is using. To keep this email shorter, I've put Chapter 6 from Workbook 1 as a downloadable pdf over on the AYWMC site. Ch 6 has all the information about histograms and metering, and explains the very very useful trick of using Exposure Compensation to quickly fix exposure errors without shooting fully manual:
|
|
|
|
|
THIS WEEK'S PROJECT
Spend a day with the histogram turned on in your viewfinder, and check it before you take every
photograph. If it looks wrong, then use either Manual mode or exposure compensation to correct the exposure. (Download Chapter 6 to read about exposure compensation.)
1. Start by taking a photograph of a piece of white paper again (not on Manual mode). The camera will assume it is grey, so the histogram should look something like this:
|
|
|
|
|
2. You know the paper is white, so you know the histogram should look like this:
|
|
|
|
|
3. Use exposure compensation or Manual mode to increase the exposure until the histogram moves all the way to the right. You can watch it move in the viewfinder, if you have it switched on.
4. Now try other subjects, indoors and out, and just pay attention to what the histogram is doing compared to what you think it should be doing.
|
|
|
|
|
RECAP
1. Read this email, and the extra post. Download the pdf.
2. Remember that you don't need to understand histograms at this stage of the course. Like shooting on Manual mode, it's enough that you know that they exist.
3. Work out how to
show the histogram on your camera. On most cameras you there is an option to have it showing in the viewfinder before you take the photograph. You can see it changing as you move the camera. On a few cameras you can only see it once you've taken the photograph.
4. Have a go at the homework.
5. Take a deep breath and look forward to the catchup week next week, with an optional fun photo project.
|
|
|
|
|
|
|
Next week is catchup week. There will be an optional fun project to join in if you are up to date, and all the information you need about the next module (Composition). If you have the workbook, you can have a go at the end of Part 1 projects.
See you in the Facebook group. Ask
any questions you have about the project over there. Post your homework photos in the thread → Homework thread 19 October. There will be a link to the thread in the pinned post.
Have fun, Emma
|
|
|
|
|
|
|
Some reminders...
By popular request (and with thanks to everyone in the FB group for helping out), I have written a new post all about lenses. Everything you wished you knew but were afraid to ask: Camera Lenses for Beginners
The video course discount coupon for this module expires this week. This is your last chance to get the discount for another 12 months: Claim 50% off Get Off
Auto module
|
|
|
|
|
|
|
Emma Davies Photography, Marigold, East Bracklesham Drive, Bracklesham Bay, Chichester, PO20 8JW, United Kingdom
|
|
|